Build an infinitely scalable* Slack app, part 2: prepping for distribution in the Slack App Directory

by Brian Leroux
@brianleroux
on

In part 1 of this series, we used Architect to provision the infrastructure needed to build a (theoretically) infinitely scalable serverless Slack app.
Slack makes it easy to install a simple app into a workspace, but to unleash the full power of the Slack platform you’ll want to enable distribution in the Slack App Directory.
In this article we will implement the Add to Slack OAuth flow with AWS Lambda and persist the resulting access token to DynamoDB.
Before you begin: ➡️ Make sure you’ve set up a local dev environment and AWS from part 1.
Set up HTML routes
In our first installment, we set up route handlers for a home page, an Add to Slack page, and Sign into Slack page. In this post we’ll focus on fleshing out the home and Add to Slack pages.
HTML content is super easy to serve with Lambda and API Gateway. However, per-route isolation does mean you may end up frequently copying view code between Lambdas.
Fortunately, Architect conveniently allows you to share code between Lambdas with a magic folder named shared that gets copied into all Lambdas with every deployment. It’s perfect for simple HTML view code and other shared bits.
- So let’s wire that up! In your terminal, set up the
shareddirectory and add a file for the layout. In your terminal:mkdir src/shared mkdir src/shared/views touch src/shared/views/bootstrap.js - And edit
src/shared/views/bootstrap.jsto read like this:module.exports = function bootstrap(params) { let {body, title} = params return ` <!doctype html> <html lang="en"> <head> <meta charset=utf-8> <meta name=viewport content=width=device-width,initial-scale=1,shrink-to-fit=no> <link rel="stylesheet" href="https://maxcdn.bootstrapcdn.com/bootstrap/4.0.0/css/bootstrap.min.css" integrity="sha384-Gn5384xqQ1aoWXA+058RXPxPg6fy4IWvTNh0E263XmFcJlSAwiGgFAW/dAiS6JXm" crossorigin="anonymous"> <title>${title}</title> </head> <body> <nav class="navbar navbar-expand-lg navbar-light bg-light"> <a class="navbar-brand" href=/>${title}</a> <div class="navbar-nav"> <a class="nav-item nav-link" href=/signin>Sign in with Slack</a> </div> </nav> <div class="container-fluid"> ${body} </div> <script src="https://code.jquery.com/jquery-3.2.1.slim.min.js" integrity="sha384-KJ3o2DKtIkvYIK3UENzmM7KCkRr/rE9/Qpg6aAZGJwFDMVNA/GpGFF93hXpG5KkN" crossorigin="anonymous"></script> <script src="https://cdnjs.cloudflare.com/ajax/libs/popper.js/1.12.9/umd/popper.min.js" integrity="sha384-ApNbgh9B+Y1QKtv3Rn7W3mgPxhU9K/ScQsAP7hUibX39j7fakFPskvXusvfa0b4Q" crossorigin="anonymous"></script> <script src="https://maxcdn.bootstrapcdn.com/bootstrap/4.0.0/js/bootstrap.min.js" integrity="sha384-JZR6Spejh4U02d8jOt6vLEHfe/JQGiRRSQQxSfFWpi1MquVdAyjUar5+76PVCmYl" crossorigin="anonymous"></script> </body> </html>` }This is rudimentary boilerplate, of course, so eventually you may want to kick the Bootstrap dependency but this will get you going quickly and cleanly. (The recently released
v4is a lot friendlier on mobile too.) - Edit
src/html/get-index/index.jsandsrc/html/get-install/index.jsLambdas with code like the following example:const arc = require('@architect/functions') const layout = require('@architect/shared/views/bootstrap') function route(req, res) { let html = layout({ title: 'My App', body: ` <div class=jumbotron> <h1 class=display-4>Add to Slack</h1> <p class=lead>Install this app to start using it in Slack.</p> <hr class=my-4> <p>${msg}</p> <p class="lead">TODO REAL BUTTON HEREEEE</p> </div>`, }) res({html}) } exports.handler = arc.html.get(route) - Run
npm run deployand reload the page to see your work. The Bootstrap layout gets loaded from@architect/shared/views/bootstrap.jswhich gets refreshed every deploy. - Now, take a moment for yourself, and savor the fact that it took you only a few seconds to complete a zero-downtime deployment of a theoretically infinitely scalable app.
The future is amazing.
Update the links
If you happen to click the links you’ll notice they currently load an ugly error page. API Gateway appends /staging or /production to help us represent the various application stages but this means a link to / fails. Architect bundles a hidden helper function on req._url for resolving the current URL.
It is worth noting that once you setup DNS, the “helpful” staging/production URLs go away and you’ll have an origin like staging.domain.com and domain.com, respectively.
Add to Slack
Now lets create code for the actual button. In your terminal run
touch src/shared/views/add-to-slack.js
And edit the file to read something like this:
module.exports = function addToSlack() {
  let scope = 'commands,bot'
  let clientID = process.env.SLACK_CLIENT_ID
  let redirect = process.env.SLACK_INSTALL_REDIRECT
  let href = `https://slack.com/oauth/authorize?scope=${scope}&client_id=${clientID}&redirect_uri=${redirect}`
  return `
<a href=${href}>
<img alt="Add to Slack"
  height="40"
  width="139"
  src="https://platform.slack-edge.com/img/add_to_slack.png"
  srcset="https://platform.slack-edge.com/img/add_to_slack.png 1x, https://platform.slack-edge.com/img/add_to_slack@2x.png 2x">
</a>
`
}The most important thing to notice about the Add to Slack button is the environment variables. We put these in variables so our code isn’t tightly coupled to its corresponding infrastructure configuration. (This is generally considered a good idea.)
Slack credentials
A brief interlude: this would be a good moment to go snag your application’s credentials from Slack.
Head on over to the Slack apps admin interface, select the app you’re working with, and snag the Client ID, and Client Secret. (The Verification Token you won’t need just yet now.)
Be sure to treat these credentials with care and caution, as they enable your app to interact with the Slack API!
Configure your Lambdas’ credentials
Now that you’ve got your Slack credentials, open up the AWS Console, find the Lambda functions we’re working with ( get-index & get-install) and add them in as environment variables, as such:
Client ID==SLACK_CLIENT_IDClient Secret==SLACK_CLIENT_SECRET
Finally, you’ll need to configure an environment variable for SLACK_INSTALL_REDIRECT, which is the fully qualified URL for your deployment, should look something like this: https://xxx.execute-api.us-west-1.amazonaws.com/staging/bot/install
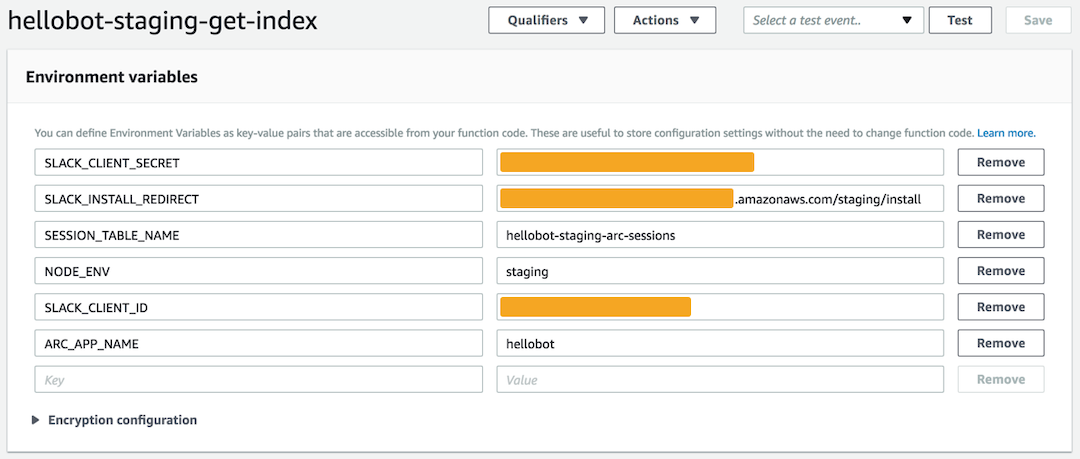
Adding SLACK_CLIENT_ID, SLACK_CLIENT_SECRET and SLACK_INSTALL_REDIRECT
👀 Take note! Functions created by Architect will be prefixed by the app name and environment.
Don’t forget to add the button to src/html/get-index/index.js and run npm run deploy to check out your work. It should look something like this:
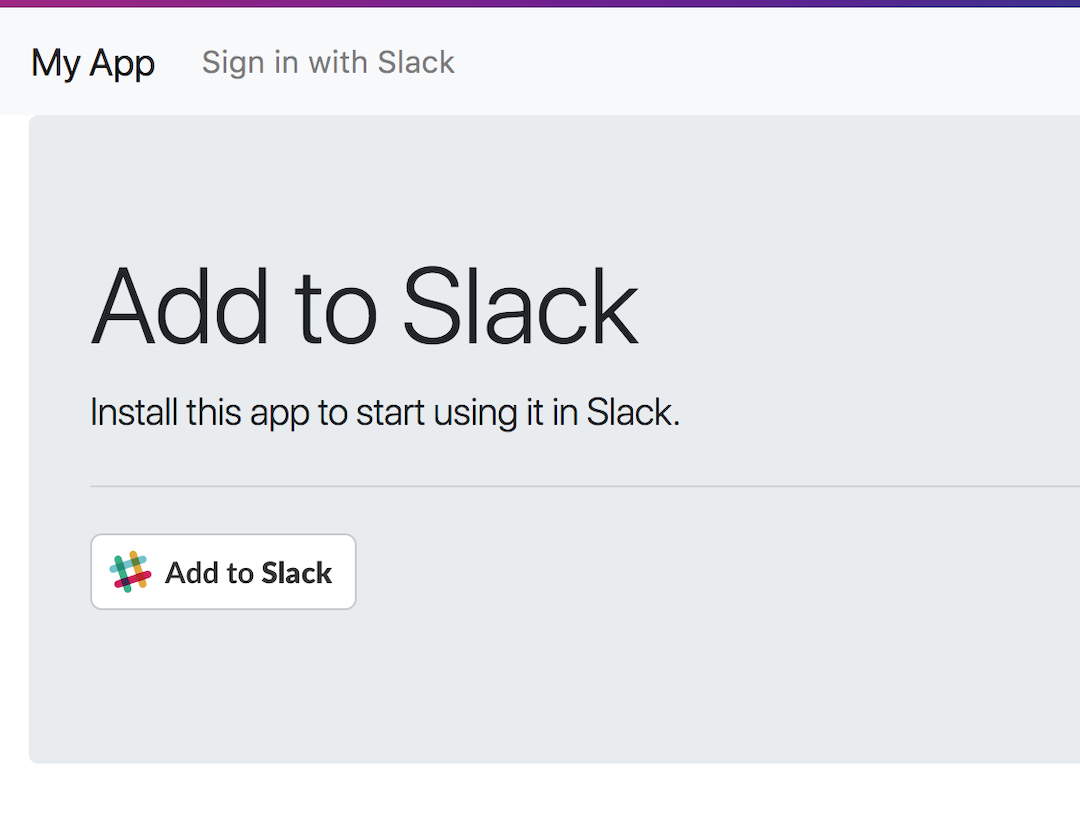
Not too shabby!
Getting the API token via OAuth
With your button in place, now it’s time to implement the button handler logic for Add to Slack.
Add to Slack is an OAuth flow, and if you’ve ever implemented OAuth before, you know it can be sort of complicated.
But it also gets you the magic token with the power to interact with the Slack Web API, so this security, while a bit involved, is important to get right!
Here’s how it looks, broadly speaking:
- The user will click the Add to Slack button and journey to slack.com wherein they authenticate and, if all is well, will be redirected back to your
/installweb page with a special query parameter code - Then we send that code query parameter along with a shared secret back to Slack in exchange for an OAuth access token
Ready? Let’s start with storing that token.
Data persistence with DynamoDB
The installation of your app into a Slack workspace comes with the very serious responsibility: storing an OAuth access token.
That access token has the power to grant many powerful permissions to access data, and act on behalf of a Slack team, team member, or even as a member of the team in the form of a Bot User.
⚠️ Bot users are a possible avatar of a near-future super-intelligent AI; so be nice!
That OAuth access token is a major 🔑. Literally!
You will want to persist this crucially important data in a durable, secure, and highly available store. In the world of serverless, DynamoDB is a great solution for doing just that.
Modify your .arc file to read like this:
@app
hellobot

@events
long-running-thing

@html
get /        # displays Add to Slack
get /install # saves a bot token and redirects back to /
get /signin  # saves a user token and redirects back to /

@slack
bot

@tables
# defines a dynamodb table with a hashkey 'teamID'
bots
  teamID *String
Execute npm run create in your project root to automatically generate the DynamoDB tables. It’ll create two; one for staging and one for production. Now you have a place to store data that is fast, secure, and scalable.
Data access layer
Data access layers are where your persistence logic goes. Web apps that talk to databases always end up with some form of data access layer. (Sometimes even formally!)
Architect provides a very tiny wrapper to DynamoDB that reads a .arc file and generates a CRUD client for any tables. Data access is a cross cutting dependency so we can use the magic “shared” folder again too.
From the root of the project in your terminal:
mkdir src/shared/data
touch src/shared/data/index.js
cd src/shared/data
npm init --yes
npm i @architect/data --save
var path = require('path')
var arc = require('@architect/data')
var arcPath = path.join(__dirname, '..', '.arc')
module.exports = arc(arcPath)Architect copies the current project .arc file into every Lambda’s node_modules/@architect/shared/.arc with every deploy.
On line 4 we grab that path and on line 5 with initialize @architect/data module with it.
This generates a DynamoDB client with the following create/read/update/delete (or PUDG?) methods:
- data.bots.put
- data.bots.update
- data.bots.delete
- data.bots.get
And more. You can read about the data module on the Architect workshop site. (If you feel particularly interested in how it works you can view at the super tiny source here.)
A full rundown of DynamoDB’s capabilities could fill volumes so we’ll just stick to saving the bot token data for today! 💾
HTTP middleware
Let’s continue on our theme of reuse and create some shared middleware to handle the OAuth code for access token exchange flow.
mkdir src/shared/middleware
cd src/shared/middleware
npm init --yes
npm i slack run-waterfall --save
touch src/shared/middleware/install.js
And edit install.js to read:
Architect middleware follows the classic Express signature of req, res, next. First we assign a URL to the home page with req._url so that it figures out /staging and /production suffix for us.
Then we check for the query parameter code. If that does not exist we redirect home. If it does exist, we enter the OAuth flow.
The waterfall module helps you to cleanly compose Node errbacks. The first named function read calls slack.oauth.access with our secrets and req.query.code.
If that fails the code will jump to the error handled on line 25. If that succeeds, the result is passed to the second named function write which removes the ok param from the raw Slack payload, adds a JS style hashkey teamID, and writes to the DynamoDB bots table we created earlier.
Execution then flows to the named done function. If the write fails we will see the error in the response. Otherwise, the function then redirects home with a query param /installed?=1. Good times!
- ⚠️ If you find Node style callbacks (errbacks) hard on the eyes, it’s important to understand that Lambda does not yet support a NodeJS runtime with native async and await.
- A Promise chain could work here too but this does not enjoy very good symmetry with the NodeJS runtime API or the aws-sdk. It is also possible to transpile to get these syntax affordances but this incurs a performance cost in terms of both payload size and runtime heap.
- Remember: Lambdas are very resource constrained and their container coldstarts are related to payload size. (Another issue with transpiled code is ongoing toolchain maintenance and debugging of the generated output.)
- In this author’s view, trading new syntax (but not capability) for a performance hit, opacity to debugging, and more surface exposed to security risks is a poor choice.
- You can solve this problem with patience: Node 8 will come to Lambda! Programming is hard enough even without making performance, security and reliability even harder. Choose wisely.
Deploy everything by running npm run deploy and check out your changes in a browser.
If the flow worked you can login to the AWS Console → DynamoDB and look for the hello-app-staging-bots table to see the data we saved.
If it didn’t work, and you didn’t get an obvious explosion on the deployed website, you can check the logs on Cloudwatch.
Stuff happens and this is perfectly normal. If you’re really stuck, ping me on Twitter: I’m happy to help out.
Summary
🆒 You have a capable, fully provisioned Slack app that anyone can install. Huge!
Next Steps
- View this example project’s source code on GitHub
- Run through the steps above to setup the
productionversion of your app! - Read part 3 here (Coming 🔜)