Introducing Enhance Music

by Cole Peters
@colepeters@mastodon.online
on
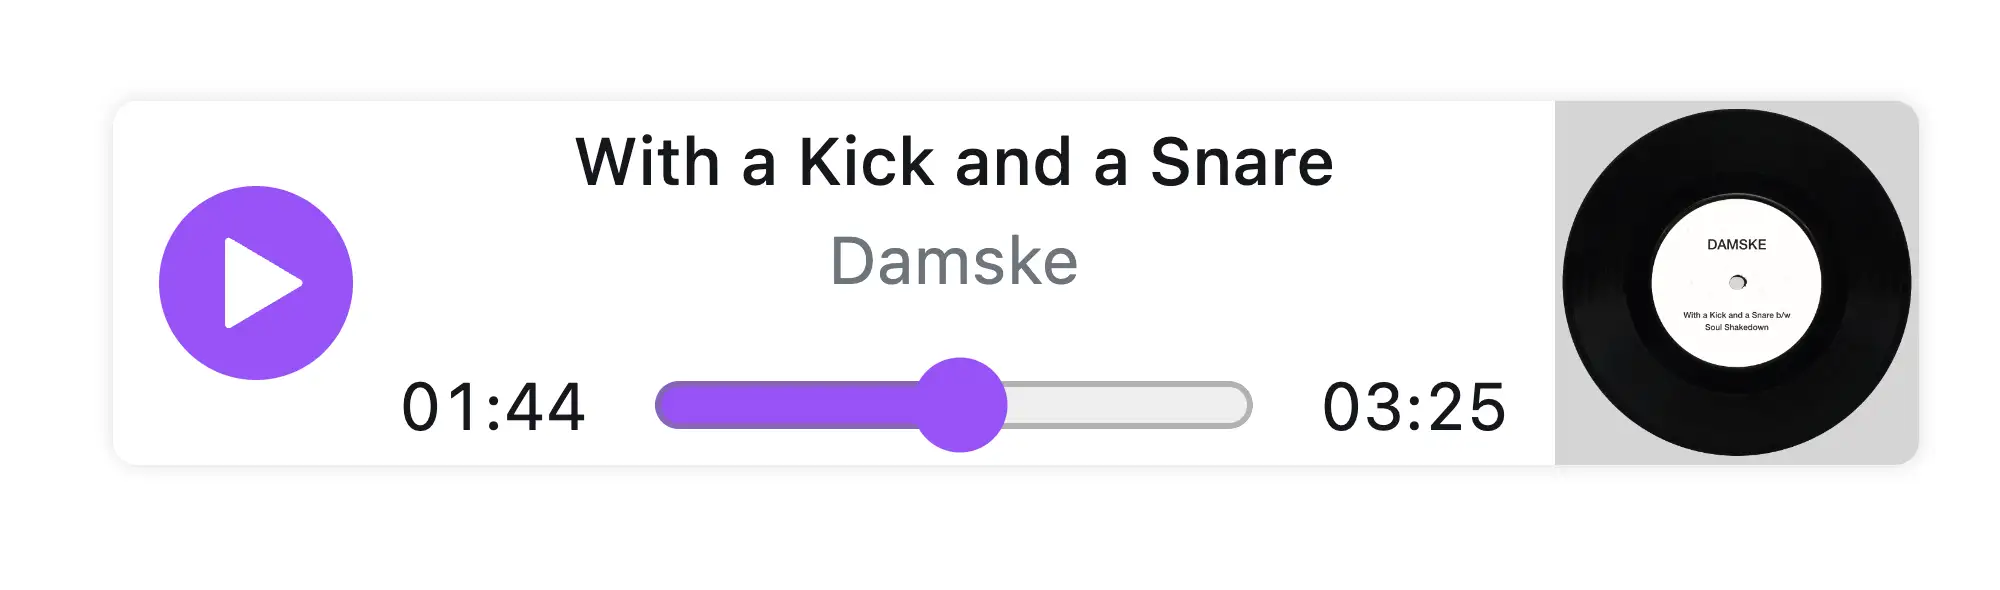
Today, the Enhance team is excited to introduce our latest demo app: Enhance Music — a music library and audio player app built with HTML and CSS, and progressively enhanced with a couple pinches of JavaScript. Despite being built as a traditional multipage website, Enhance Music features an audio player that persists across page loads, and some gorgeous interactive UI built entirely with web standards.
As with our previous demo app, Enhance Movies, Enhance Music is designed to highlight the sort of developer and user experiences that can be achieved by focusing on building for the web platform itself, with a bit of help from Enhance.
In this article, I’ll give you an in depth look at how Enhance Music works under the hood, with the hopes of giving you a few additions to your web development tool belt. Feel free to take a look at the codebase as you follow along!
A fully functional music library, without the struggle stack
Highly interactive interfaces (such as one for a music player) are often cited as reasons for employing a host of JavaScript libraries. We’re often told that the complexity of managing interactivity inherently requires third party frameworks and abstractions of markup, styling, and web platform APIs. I can recall this being at least occasionally true many years ago — it used to be that building even basic interfaces such as accordions or tabbed navigations on the web could prove to be tough without at least calling in the likes of jQuery to tame cross browser quirks. I can also recall the many years I spent building interfaces in React, when I’d immediately jump over to NPM as soon as I needed to build something more trivial than putting static text on a page. (Forms? Better check NPM. Dialogs? There’s a package for that. Animations? Spoiled for choice!)
But is this still the case in 2023? Do we need to transpile proprietary dialects of JavaScript to describe our UI? Do we need fully featured state machines or reducer functions to keep track of permutations of those interfaces and their data? Do we need a Single Page App (SPA) architecture to deliver richly interactive and stateful experiences?
We’ve found that the answer to all these questions is a hard ‘nope.’
Depending on your experience — and given the ubiquity of SPAs today — this answer may be surprising. But multipage sites aren’t the relic many might think they are. When asked to explain his preference for multipage architectures recently, Jeremy Keith wrote on his blog:
For most use cases, a website (or multi-page app if you prefer) is going to provide the most robust experience for the most number of users. […]
There are some cases where you’d want a state to persist across pages. Let’s say you’re playing a song, or a podcast episode. Ideally you’d want that player to continue seamlessly playing even as the user navigates around the site. In that situation, a single-page app would be a suitable architecture.
But that architecture comes at a cost.
I agree with Jeremy. I think there may still be some situations in which building an SPA is a suitable choice (though amusingly given Jeremy’s example of an audio player, we’d wrapped up Enhance Music just a day or two before).
However, I also think the number of situations in which an SPA architecture can be recommended is dwindling, chiefly due to how good the web platform has become (and how much better it’s getting every day). And because so much of the rest of the ‘struggle stack’ (transpilers, unique dialects, etc.) was built to get around gaps in the web platform that no longer exist, the use cases for these tools is dwindling in tandem.
This is good news: not only can we avoid piling up transient knowledge about a seemingly endless stream of dependencies, we can also eject from the routine stress of those dependencies changing or breaking under our feet and throwing wrenches into our workflows — all while delivering more robust and performant websites to end users.
By delivering a rich (and resilient) interactive experience built solely with web standards and a multipage architecture, Enhance Music demonstrates this premise very well. So, without further ado, let’s start walking through how we built it.
No component is an island
The inspiration for Enhance Music came from Maxi Ferreira’s recently updated Astro Records demo app. What’s cool about this application is that it’s actually built on a multipage architecture, with a user experience that feels very much like an SPA. Although you can navigate through multiple pages (a library page, individual album pages), if you start playing a track, that audio player UI will stay with you as you move between those pages.
This is accomplished using Astro Islands, which allows components rendered with client side JavaScript to persist between otherwise static page loads. The result is a traditional multipage website that gets upgraded to a more seamless experience in the browser. In combination with the View Transitions API, this produces a very slick result.
There is a catch here, though: because Astro Islands (and other client side routing solutions, such as Turbo Drive) rely on JavaScript to function, these persistent interfaces can only be rendered if the application’s JavaScript downloads and executes successfully for the user. Unfortunately, that can be a big ‘if’. Not everyone has JavaScript — at least not all the time.
This got us thinking: could we create a better experience for those users for whom JavaScript is unavailable? How could we use a multipage architecture while allowing some piece of our UI to persist between page loads without relying on JavaScript?
Sometimes the old ways are the best ways, and in this case, we found our answer in an older HTML element: the Inline Frame element, better known as the iframe.

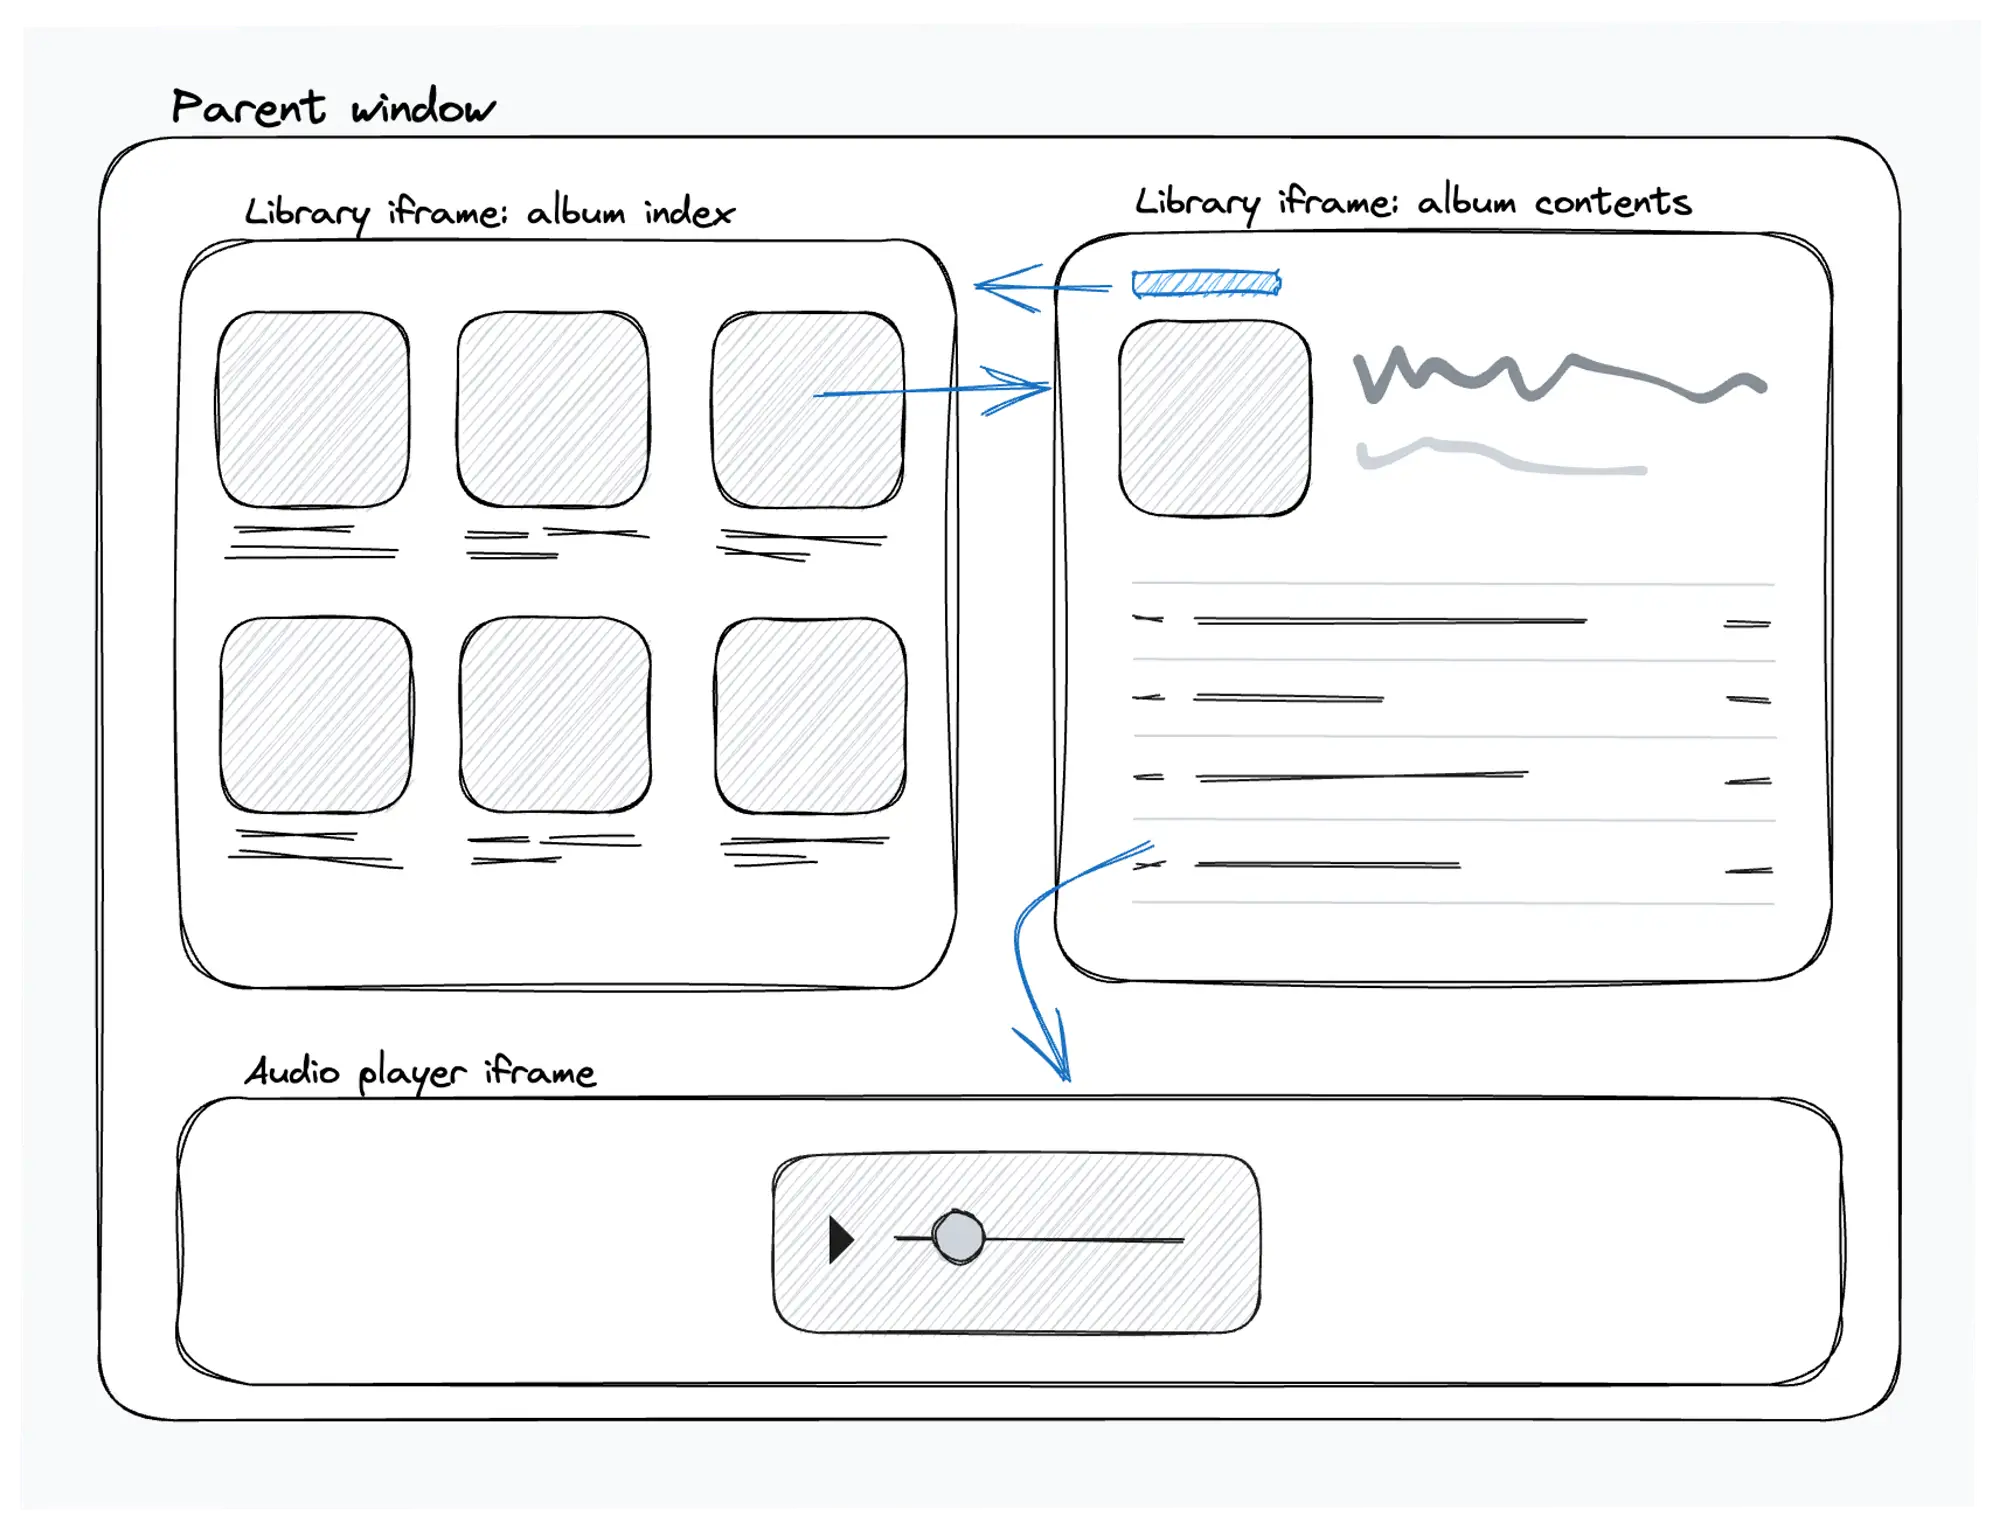
Web developers typically associate iframes with third party integrations — think of embedding a YouTube video, Google Maps content, etc. But iframes can also be used to embed your own content within a parent page. Additionally, using the target attribute, links can target specific iframes within the parent document by name. Thus, if you were to embed two iframes within a document — say, one iframe for a music library, and another for an audio player — you could create a navigable music library in one iframe and a persistent audio player in another.
And that’s exactly what we did.
Structuring the foundations
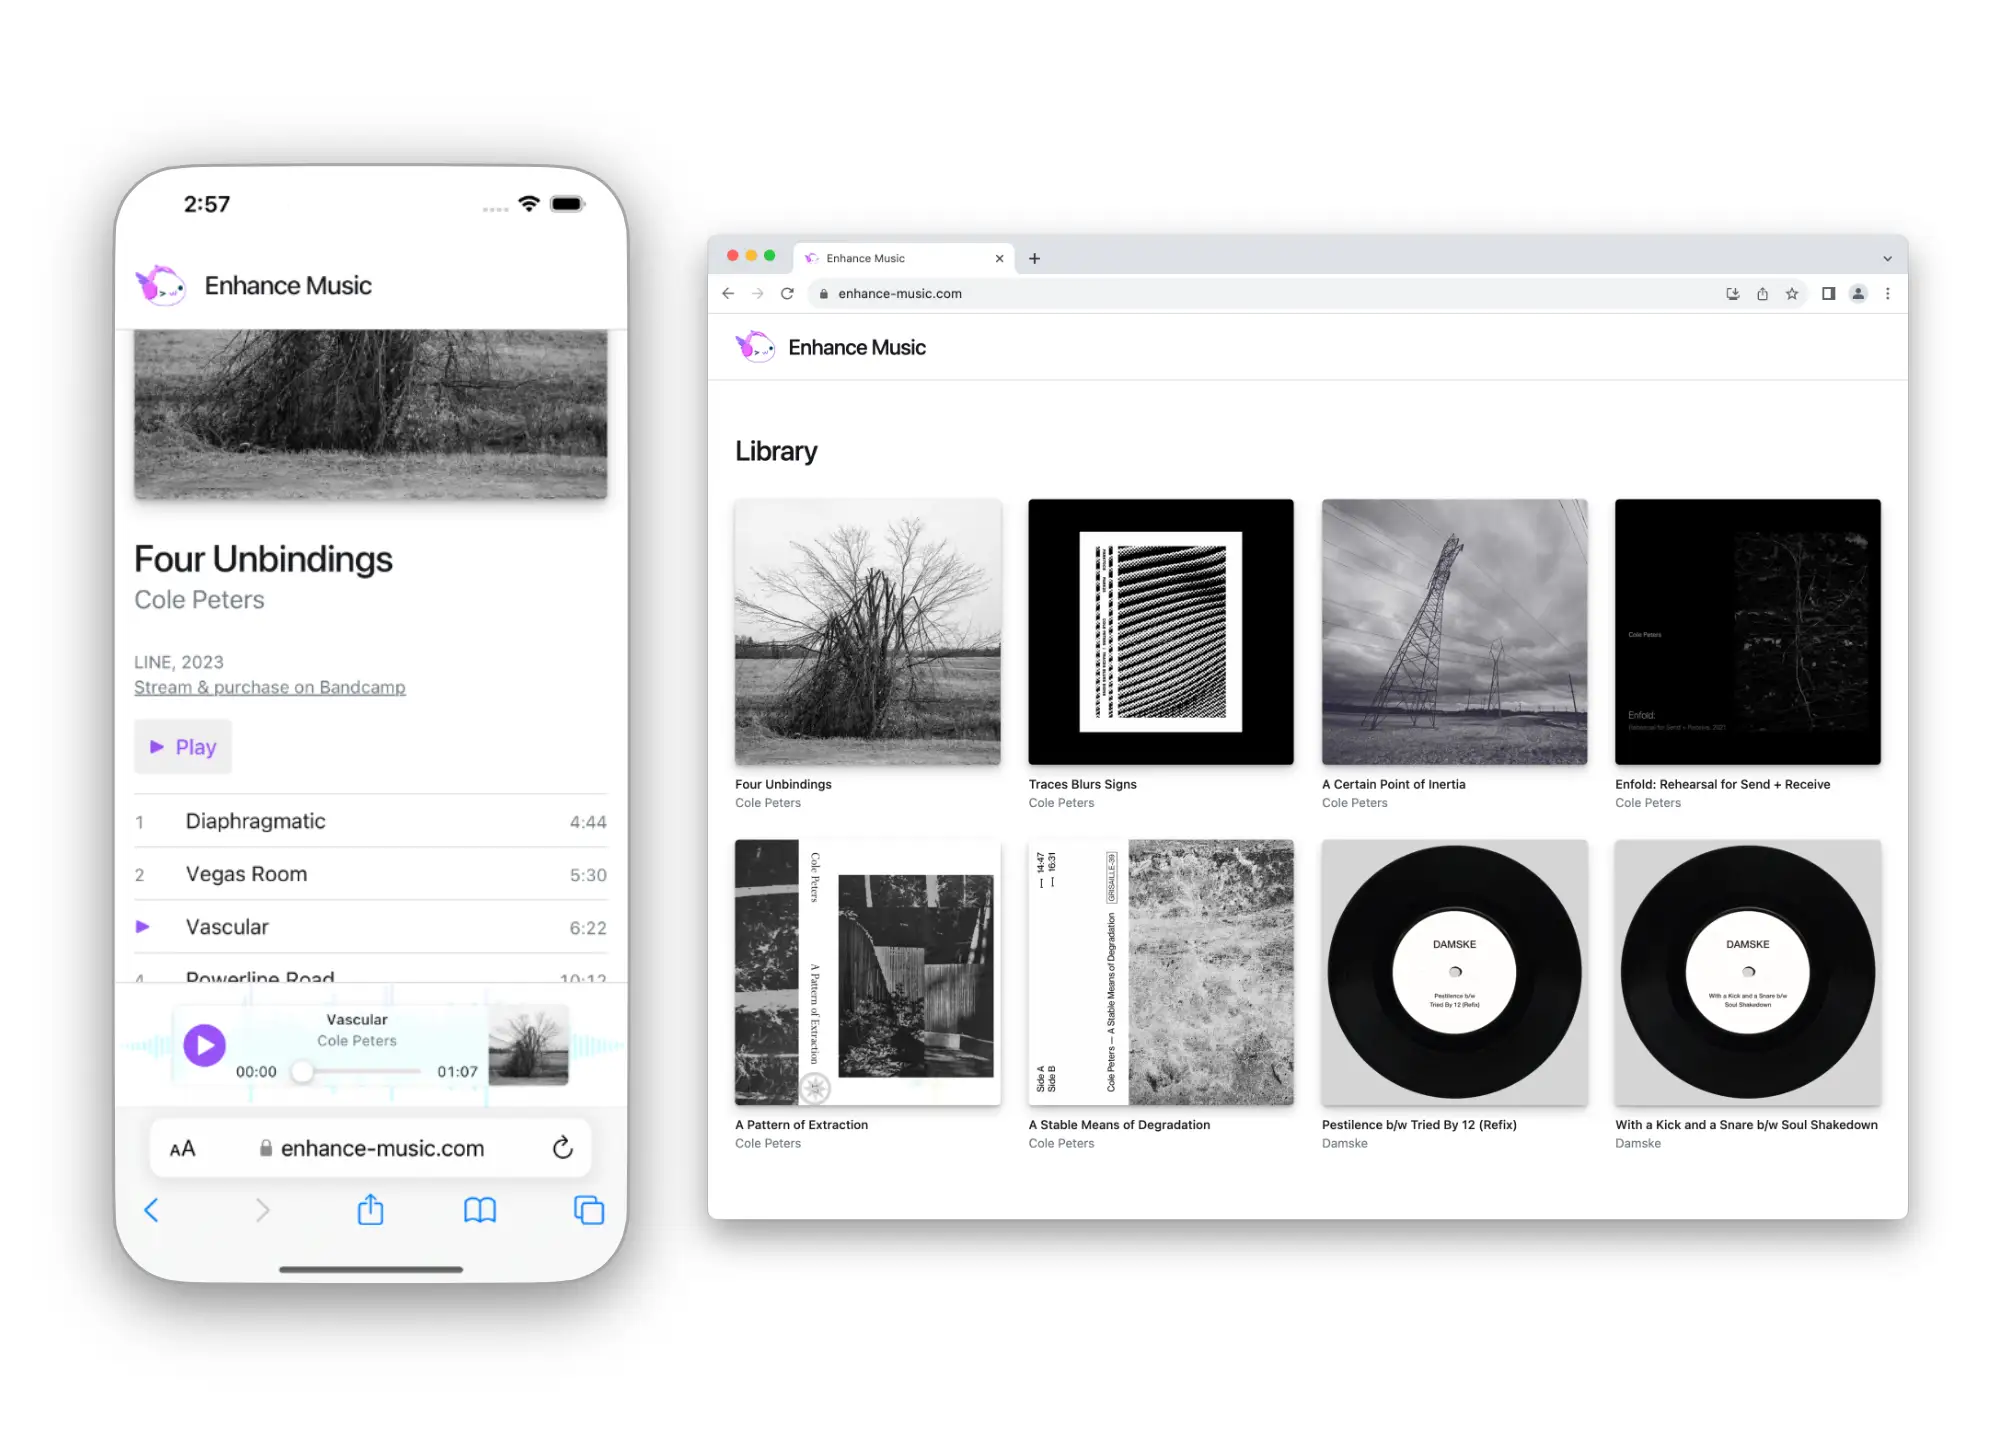
Looking at our website’s index page, you can see the content is straightforward: one title bar custom element, and our two iframes. When a user first accesses this page, the first iframe will contain our music library page, while the second (reserved for the audio player) will simply be blank, since no track has been selected yet. Wrapping this content is our layout grid custom element, which creates a grid layout for the three aforementioned elements. You can see that the first row of the grid will be sized automatically based on the content (that’s where our title bar custom element goes), while the second row (for our library iframe) will take up whatever remaining vertical space is available in the viewport. The last row, which will hold our audio player iframe, is sized using the grid-auto-rows property, as we’ll be doing some progressive enhancement later on to display that iframe dynamically.
Our library page is pretty straightforward — it renders an instance of our music-library component, which contains a layout element for our grid of albums and an instance of our album-item element for each album in the library. Finally, each instance of this component links to a dedicated page for its album, which is rendered primarily with the album-data element.
The album-data element involves a bit more orchestration of styling, logic, content, and interactivity, so let’s step through it briefly.
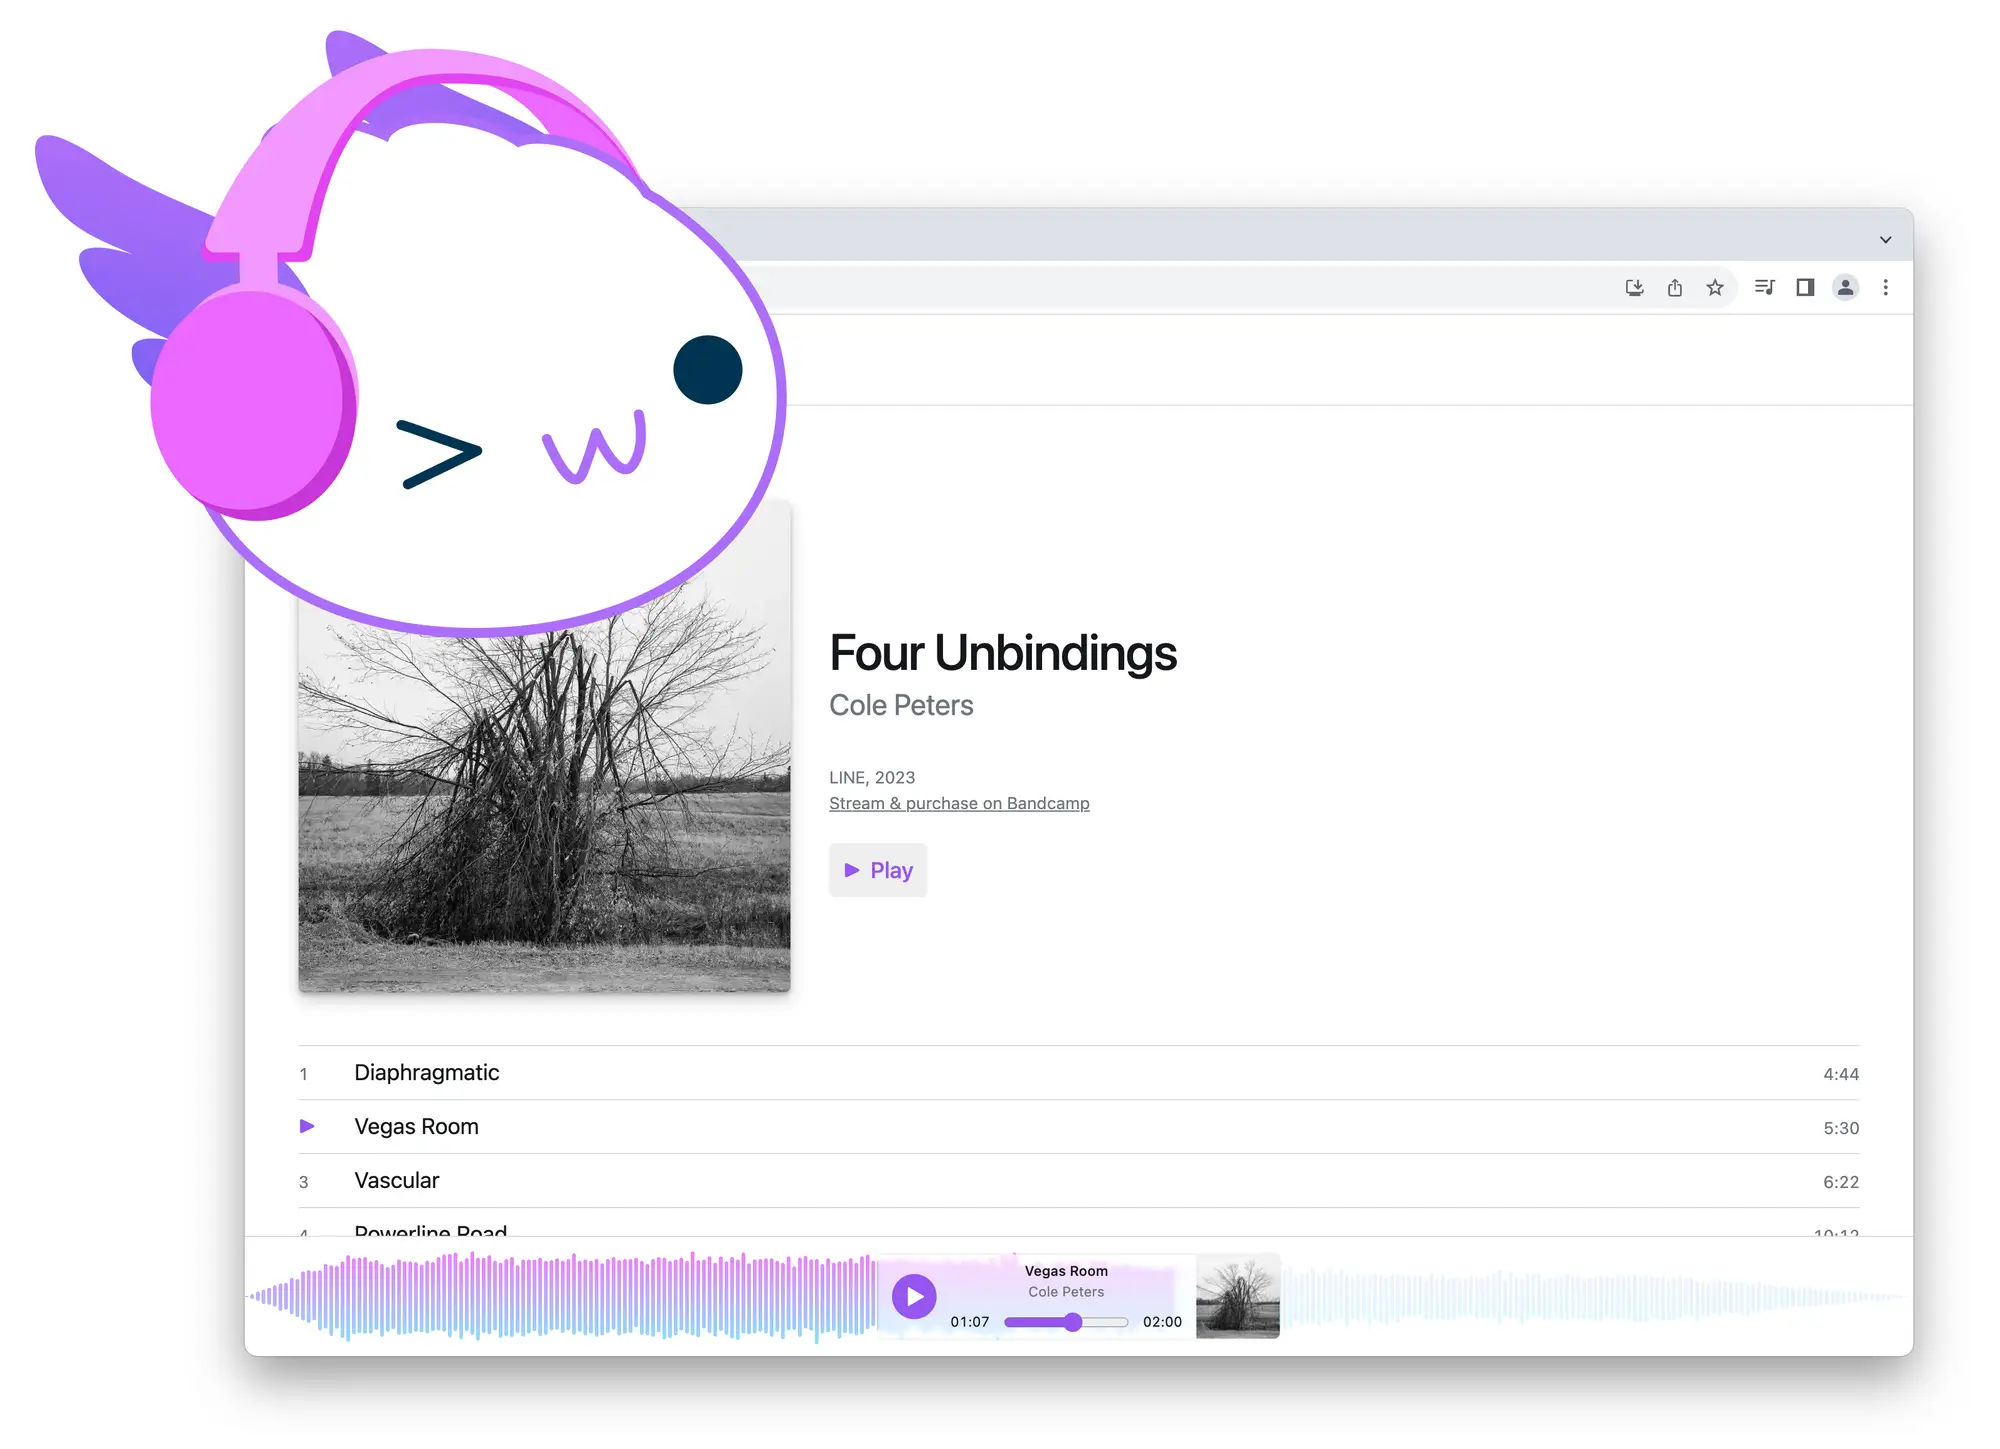
The markup for this element is where we structure the content pertaining to each album. We start by reusing our album-cover element to show the album’s cover, and then we render a header element to contain all the top level information about the album, like its title, artist, record label, the year it was published, a link to a Bandcamp page (if one exists), and finally, a button to start playing the album. Finally, we render the album’s tracklisting using an ordered list, where each track gets its track number, title, and length dumped into a link.
The way this track link is set up is important. Note that this link points to a dynamic route for the track itself, and that the link’s target attribute is set to player. That target attribute allows us to tell the browser to render that track’s page in our audio player iframe, since we named that iframe player in our index page.
Thus, when a user selects a track for playback, that track will be rendered in the audio player’s iframe, leaving the user free to continue to navigate within the library’s iframe without affecting the audio player’s state. This gives us an audio player that follows us around the library — with zero JavaScript required.
However, this doesn’t mean we can’t use JavaScript to upgrade the user experience when it’s available. This brings us to our first use case for progressive enhancement.
Enhancing the tracklisting
Any decent music library will provide some visual indication of which track in a tracklist is currently playing, and with just a little JavaScript, we can make that happen.

To indicate which track is currently playing to both sighted users and those using a screenreader, we rely on the aria-current attribute. This attribute is perfect for our use case, as it’s meant to indicate which item within a list of items is currently active.
To begin, note that within each link in our tracklist, we render both a track index and a playback icon in span elements. If you refer to our styles for the index and playing classes, you’ll note that the playback icon will only be rendered within a parent that matches the [aria-current='true'] selector — in which case, the track index (via the index class) will not be rendered. This means that all we need to do with JavaScript is to add the aria-current='true' attribute to the track that’s been selected by the user.[1]
We accomplish this by registering an event handler on each track’s click event[2], getting the track number from the track’s data attributes, and running the setCurrent function with that track number to apply the aria-current attribute to the correct track element. We also run this function on the initial page render, in case a track in the album we’re viewing is already playing when the album’s page is loaded.
With this code in place, users with JavaScript available will now see a playback icon appear in place of a track’s index when that track is played. Users without JavaScript will miss out on this, but given that this is a non essential feature, that’s alright — that’s why it’s called ‘progressive enhancement’ and not ‘progressive bare minimum’.
That covers navigating between our library and its albums and choosing a track to play — but how do we manage actually playing those tracks? Let’s dive into our audio player implementation.
Audio players for (almost) everyone
As mentioned, each track in our album tracklist renders a link within a list item. That link, in turn, gets targeted to our audio player iframe when clicked. The route that we point to with each audio link gets handled by a dynamic API route (/player/$id.mjs), which is responsible for returning the relevant track data based on the dynamic portion of our route[3]. This data then gets passed to the audio player element via the state attribute (which you can see in action here). Finally, our audio player element can use that data to render our audio player.
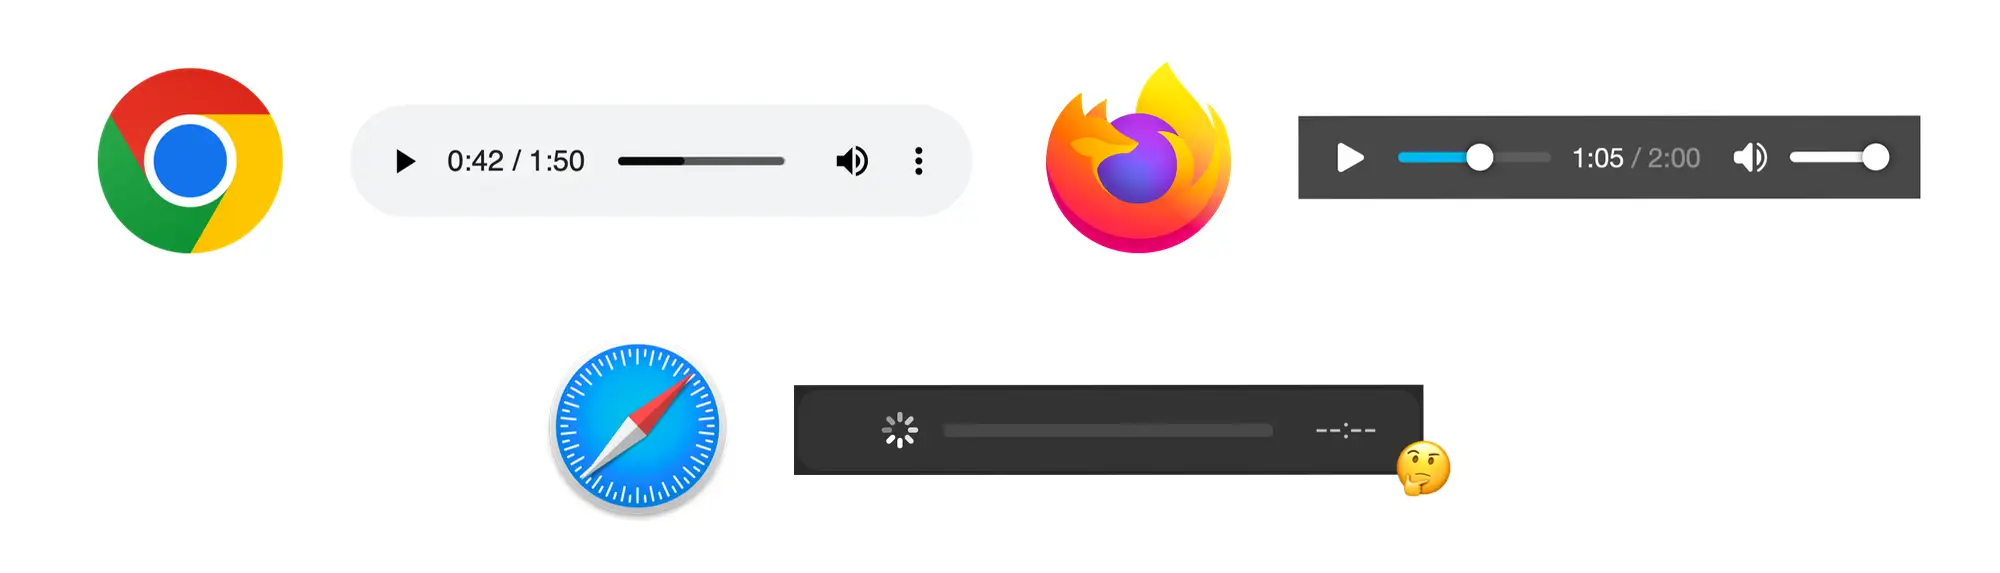
As with the rest of our app, we want to provide users with a fully functional experience when JavaScript is unavailable — and for that reason, we default to serving our users the selected track via the audio element. This will allow every user who downloads our HTML to play the audio back using a system audio player with full playback controls. The interface may look a little different between different browsers and operating systems, and it may not exactly match the look of the rest of our app, but that’s okay — it does a great job of playing back the audio the user requested! (Except in Safari[4] — see that footnote if you’re morbidly curious.)
With our ‘zero JavaScript’ happy paths now covered, we can have a little more fun when JavaScript is available in the browser.
Enhancing the audio player
Building a custom audio player isn’t the easiest task, but it can produce great results, as we’ll find out shortly. The key is to use semantically appropriate elements wherever possible (and ARIA attributes when necessary), and getting to know the HTMLMediaElement interface as intimately as possible.
Let’s start with the markup for our custom audio player. The entire component is wrapped in a figure element to indicate that the content inside it is self contained. Next, we add a button to toggle the playback of our audio track (note the ARIA attributes used to semantically relate this button to our audio element). Finally, we render some markup for the track’s metadata and album art, and — especially important — a range input to indicate and modify the track’s playback position. Since this input controls audio playback, we use an appropriate ARIA attribute here, too.
Now that we’ve got our required markup, it’s time to dive into interactivity with Web Components and the HTMLMediaElement interface. The script tag which contains this functionality is a little gnarly, but we’ll walk through the most important points (and for the moment, we’ll bypass the portions of this script concerned with our waveform UI).
First, take note of AudioPlayer class’s instance properties; we’ll be using these to refer to and modify certain aspects of our audio player. Next, note that we’re creating a new instance of our audio element programmatically. We do this instead of declaring an audio element with HTML because we need to attach event listeners to this element, and by the time this JavaScript executes on the client, some of those events may already have been fired by the browser before we can attach those listeners. (Yes, you read that right: we actually need to account for the fact that JavaScript is slower than HTML to get this right.)
Next, we add an absolute ton of event listeners to our playback button, audio element, and our timeline (AKA our range input). This will allow us to use these events to trigger the expected behavior from our audio player. We’ll get to the specifics of these momentarily.
At last, we get to render some content! Once all our setup is complete, we use a few DOM methods to hide the system audio player, insert our programmatically created audio element, and reveal our custom audio markup, which was previously hidden from view. In combination with our custom element styles (which are handily scoped to our custom element by Enhance), we now have a custom audio player ready to be interacted with.
Let’s go over each of these interactions in a little more detail.
Playing and pausing
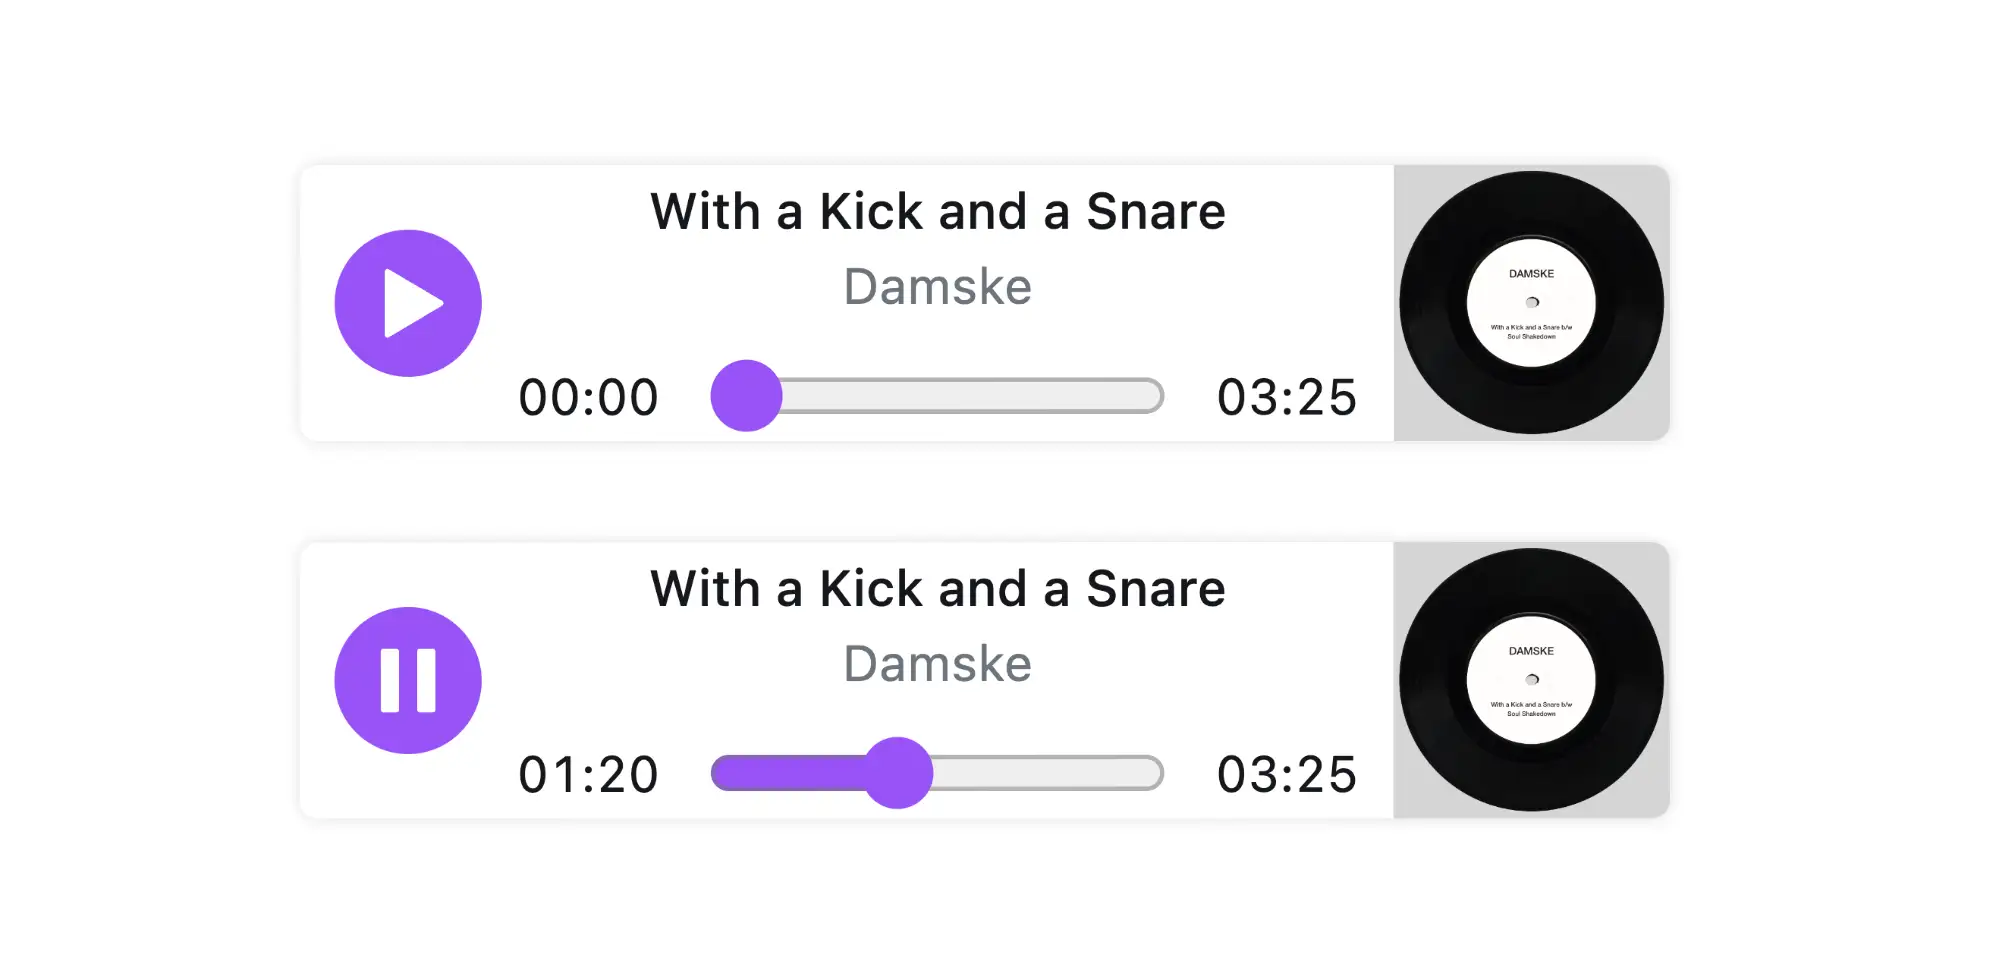
This one’s pretty straightforward. Our playback button fires the onPlayPause function when clicked. This function plays or pauses the audio track, depending on whether it’s currently paused or not.
Then, because we registered event listeners for the play and pause events on the audio element itself, our playback button’s aria-pressed attribute will be updated accordingly by the onPlay and onPause functions. These attributes inform the user of the button’s current state, and cause the proper icon within the button to be displayed.
Updating the current time display
Every time the audio track’s currentTime property updates (usually a few times per second, depending on the client), our onTimeUpdate function is fired. This function is responsible for updating both the value of our timeline element (the range input) and the inner text of our custom audio player’s current time stamp.
Adjusting the playback position
Here’s where things get a little more nuanced.
Along with indicating the audio track’s current playback position, we also want our timeline element to be interactive, allowing users to seek to a specific playback position within the audio track. This is why we used the HTML range input element for our timeline: it’s both illustrative (as we saw in the previous section) and modifiable.
When users interact with HTML range inputs, developers can be notified of changes to its value at two different stages: first, input.oninput, which occurs while the input is being modified (i.e., the user is actively dragging or otherwise manipulating the input); and second, input.onchange, which occurs when the user finally commits a particular value (i.e., when the user disengages the range input). This is important to know, as we need to handle each event differently.
To begin, let’s examine our onTimelineInput function, which fires every time the input is manipulated. Because we’re keeping our timeline’s value in sync with the audio track’s currentTime property, we first need to remove the event listener responsible for doing so — otherwise, the user’s interaction would be cut short by the audio track continuing to update the input’s value in the background. By removing that event listener, we can give the user full control of the input’s value (and position).
Next, as the user continues to update the timeline’s value, we use that value (provided by the event.target.value property) to set the UI’s current time stamp, in order to indicate this position in time to the user.
Eventually, the user will commit a value to the range input — this is where our onTimelineChange function takes over. In this function, we first assign the chosen value to both our timeline input and the audio track’s currentTime property. Then, in order for the timeline to resume staying in sync with the audio track’s playback position, we reregister our event listener and callback.
Whew! It’s a bit of a whirlwind, but with this code in place, we now have a fully interactive custom audio player!
At this point in developing Enhance Music, we were pretty happy with our results. We had a navigable music library with a persistent audio player, and a bunch of great progressive enhancements to make things look and feel smooth via JavaScript (when available).
But then we got a little greedy and decided to add another bell and whistle or two.
Final enhancements
As I mentioned earlier, there are a lot of presumptions out there about what can and cannot be accomplished in terms of UI without resorting to pulling in JavaScript libraries like React. This especially extends to creating rich, dynamic visual effects and data visualizations. We wanted to take this opportunity to demonstrate that web standards are fully up to this task — and that using them to do so can actually be pretty straightforward!
A common visualization we see on a lot of audio player interfaces is a representation of the current audio track’s waveform. We thought it would be awesome to do something like this with Enhance Music to provide a little more information about the current track’s content and dynamics, as well as to satisfy our cravings for a little razzle dazzle.
I mentioned avoiding the propensity to resort to NPM as a first response earlier, but that doesn’t mean we should ignore the value of NPM entirely. At this point, not wanting to invest the time required to learn how to derive a waveform graphic from an audio file from scratch, we finally headed over to NPM to see what sort of libraries might be available to help us out with this. That’s where we found Wavesurfer.js, an open source JavaScript library for generating and customizing waveforms, with support for HTML5 Audio and Web Audio. With an easy to follow interface and a mere 43kb addition to our site’s payload, this was a perfect solution for our needs.
Waveform.js uses the Canvas API to generate its graphics, so after a bit of poking around through various docs on MDN to learn about canvas gradients, I was able to come up with a couple of custom gradients to use as the fill for our custom waveform. Applying that gradient to our Wavesurfer instance and adding further customizations was a piece of cake. So, too, was syncing the Wavesurfer instance up with our audio track’s progress, which provided us with even more flair for our custom audio player. With this in place (and using a little CSS filtering on our audio player), we arrived at a gorgeous visualization of our audio track, layered beneath our custom audio player.
We decided to add one more piece of progressive enhancement to Enhance Music at this point: hiding the audio player iframe when a track hasn’t been loaded. The empty audio player iframe taking up room on our layout when there was no content to show wasn’t ideal, but it took just a sprinkling of JavaScript to hide the iframe once our script loads, and to then listen for load events on it to show the iframe once an audio track has been selected. No sweat!
Our final investigation for Enhance Music’s UI focused on view transitions. This worked well when testing our library view in isolation (and you can see it in action here, using Chrome Canary), but upon verifying this in the app itself, we realized that view transitions are not yet supported in iframes. Given that this spec is still so early in its rollout, that’s pretty understandable; we even got a bug filed in Chromium to track this. Once the spec rolls out though, this simple addition to our album cover element should have view transitions working smoothly, which should help to make navigation through the library even more seamless.
A fully functional music library, backed by great performance
Not only is Enhance Music a great example of a fully functional interactive app built entirely with web standards, it also performs exceptionally well: as in, ‘all 100s on PageSpeed Insights’.
But honestly, getting the performance to this point mostly just happened on its own. We formatted our album covers as .webp images and sized them appropriately, and we kept bundle sizes in mind when looking for waveform libraries on NPM, but otherwise, the strategy here could be summed up as: ‘Use the platform.’
By relying on HTML, CSS, and the smallest amount of JavaScript necessary, achieving great performance becomes almost a matter of course. This isn’t to say that no thinking had to be done at all — after all, Enhance is built from the ground up with performance in mind, and we did spend a bit of time researching appropriate ARIA attributes for our custom audio player — but rather that by working with the grain of the platform instead of ejecting into JS frameworks, transpilers, and other overheads, one learns to build performantly (and accessibly) from the start, rather than trying to make performance and accessibility happen in the ‘polishing’ stage (which seldom works anyway). This is as true for authoring simple static sites as it is for rich interactive web apps — and I think Enhance Music demonstrates this quite well!
Summing up: on the longevity of web standards
Working on Enhance Music over these past weeks reminded me of the last time I worked on a web project involving an audio player. I was building a module for a pretty intense React application — a series of learning activities for English students, which required a custom audio player to play back pieces of dialogue or other spoken materials. While both that audio player and the audio player for Enhance Music were built on top of the HTMLMediaElement interface, the former was necessarily interlaced with React specific implementation details — details that involved time, problem solving, and results that I will never be able to transfer to another project or component. Even if I were to build that audio player in React again today, I’m confident that at least some of the React specific details would have to change to be compliant with the current version of React. The audio player for Enhance Music, meanwhile — being built solely with web standards — has given me knowledge and tools that I will be able to bring with me as long as the web platform itself exists. That’s pretty powerful.
This isn’t meant to disparage React, or any other JavaScript view framework. For me, this instead highlights the incredible benefits of learning and building with web standards: your code — and more importantly, the knowledge you acquire while writing it — remains portable forever. HTML, CSS, and JavaScript are fully backwards and forwards compatible, and modern web browsers are too. The knowledge I’ve picked up building Enhance Music will remain useful and applicable for as long as I’m writing code for the web, which will allow me to focus on critical problem solving in the future, rather than relearning problem solving strategies I’ve already internalized. In today’s fast paced web ecosystem, that’s a huge advantage — and, frankly, a relief.
Not only does this knowledge remain useful, but the results speak for themselves: Enhance Music delivers exceptional performance, a beautiful multimodal interface, and is even ready for future web features like view transitions in iframes (presuming the spec doesn’t change — which, to be fair, it could… but that’s okay).
I hope this deep dive through Enhance Music has been as enjoyable to read as it was to create the project itself, and I hope it’s given you some ideas for your next project! Please feel free to explore the source code and borrow whatever pieces of it might be useful to you.
And if you’re excited about what can be done with Enhance, be sure to check out the Enhance website and docs, or join us on Discord to ask questions or share your ideas.
See you next time!
Note that we don’t write
aria-current='false'to our tracklis’ markup by default. If we did this, screenreader users who don’t have our JavaScript available would be told that none of the tracks are the ‘current’ track, even after selecting one for playback, which would be confusing to say the least. For this reason, we only includearia-current='false'attributes when updating all of the tracks via JavaScript. ↩︎Because a click event might occur on an element nested within the track’s
lielement, we use theclosestfunction to get to theli’sdatasetfrom the event’starget. ↩︎For more on dynamic routes and path parameters, see the Enhance docs. ↩︎
First, the
autoplayattribute we’ve used on the audio element won’t work the first time an audio track is loaded in Safari. WebKit exerts much stricter controls over this attribute than other browsers, so you’ll need to play the first track you request manually if you’re exploring Enhance Music in Safari (this will also apply to our custom audio player). Unfortunately, if you have JavaScript disabled, none of this will matter: Safari itself seems to require JavaScript in order to play back audio files, which is quite a vibe. Attempting to play audio files with Safari’s ‘Disable JavaScript’ option enabled completely prevented audio files from playing at all in our testing, even when requesting the file directly from the Network inspector. Turn JavaScript on, and presto: Safari will gladly play that same audio file! You can’t say we didn’t try. ↩︎
Web Mentions
-
https://lobste.rs/~carlana 12/26/2023
Source: "https://lobste.rs/s/pjccms" -
@sil 10/5/2023
-
@sil 10/4/2023
-
Unknown 9/30/2023
-
@sil 10/4/2023
-
Unknown 9/30/2023
Source: "https://derp.foo/post/274755" -
@sil 10/5/2023